

Firstly, hello, and an especially warm welcome to everyone who found their way here from TikTok!! Over 100 new subscribers have subscribed since Part 1, and I am truly honored. (And a little intimidated!)
And please accept my apologies for the long silence, a busy summer robotics internship kept me occupied. But now that school season is back in full swing, I too am back behind the educator’s desk to attend to your sharp and engaging questions and comments!
Now, let’s continue to support you agent-ifying your life!
Excitingly, a number of you have asked (with varying degrees of urgency) “are you finally going to teach us how to build an agent?!”
Yes.
Sort of…
Almost!
Right now, I am going to have to ask for more of your patience. (But if you’re here, that means you willingly signed up for my teaching style: pedantic and verbose.)
“I am a Mechanical Engineering PhD student [and] refuse to teach you how to make things without data provenance you can check, or outputs with generic aesthetics that have no grounding in your own critical thinking or personal taste.
…
I believe in reading [and that the] belly of generative AI is words. If you do not engage with them carefully, you will not like this material. [Finally,] I need you to understand that careful reading is the same practice as careful intent formation, and you will need both to be successful here.”
If that all sounds good to you, herein, we will discuss the two foundational knowledges you need to BUILD (yes, finally, build) in Part 3.
First, we will build your workspace. Folder structure, files, and a physical orientation to your own machine. I know this sounds like housekeeping. It isn’t. Well, yes, it is. But housekeeping is important, especially with agents. Andddddd it is the first axiom of the engineering discipline: “Garbage in, garbage out” aka GIGO. Additionally, at this stage, as a non-technical person, the workspace is the work because setting it up will help you develop the mindset of a designer, an engineer, a computer scientist … which leads us to the second:
Second, we will learn about how to think. Because the real bottleneck, as I discussed in Part 1, is clarifying your intent, maintaining an overview of that intent over time, and being able to audit that your intent was indeed met. And to get you up to speed, I will give you the world’s shortest graduate-level education in design research, engineering requirements, and systems thinking.
A lil’ note on which stage you are on: Many of you mentioned you are already on stage 3, 4, 5, even 7! For this part, what stage you are on matters minimally. In Part 3, we will focus on building for people in Stages 1 and 2 (with later parts will focus on the following stages, sequentially).
Building your workspace
Step 1. Before you open anything, tidy your computer first
This section gets skipped in most tutorials. Don’t skip it.
As we have established above, computer scientists have a saying: garbage in, garbage out. This axiom predates generative AI by decades and is used to explain that the quality of a system’s output is bounded by the quality of its input. And in this case, as you bring more and more agents into your life, your workspace is the agent’s input. So, if it’s a mess, the agent is working from a messy workplace.
Some people can work in mess. Computers that do, break and/or make slop. Instead, may you be inspired by the concept of ‘knolling’ popularized by Tom Sachs . . .
For most people I have helped learn Claude Code so far, their computers are messy in a very specific way: everything ends up on the Desktop. Screenshots, half-finished documents, random downloads, folders that were once projects, files with names like final_FINAL_v3.pdf. For most everybody, the Desktop becomes a dumping ground.
For some of you, however, I have learned that everything might actually be landing on your Desktop because you didn’t know there was anywhere else.
Well, if this is you, today is the day that you learn: the Desktop is not your computer. It’s just a folder on your computer. Or a room in a much larger building, continuing from the extended metaphor we discussed in the last post. But in the building that is your computer there are other rooms: Documents, Downloads, iCloud Drive, an internal drive with system folders you’ve never opened.
But please hear no judgement in either not knowing your Desktop isn’t the whole shebang or knowing it isn’t the whole shebang and still having it be messy, earnestly it doesn’t really matter.
Well. No.
It didn’t really matter.
But it matters now.
See, the agents you build will navigate by file ‘path.’ And your agents need to know where things are to find them. If your file structure has no logic, your context layer has no foundation, and the paths will be a mess at best. At worst, perhaps your agents can navigate it (in fact they most likely will, as they are ferocious readers that can sort mess in milliseconds), but you will have no oversight because you are oblivious to where things are, how things are organized, which will make navigating from stage 1 to stage 8 nearly impossible in your brain. Ultimately, this will lead to audit-ability collapse, which you know I am allergic to.
File Tree Terms
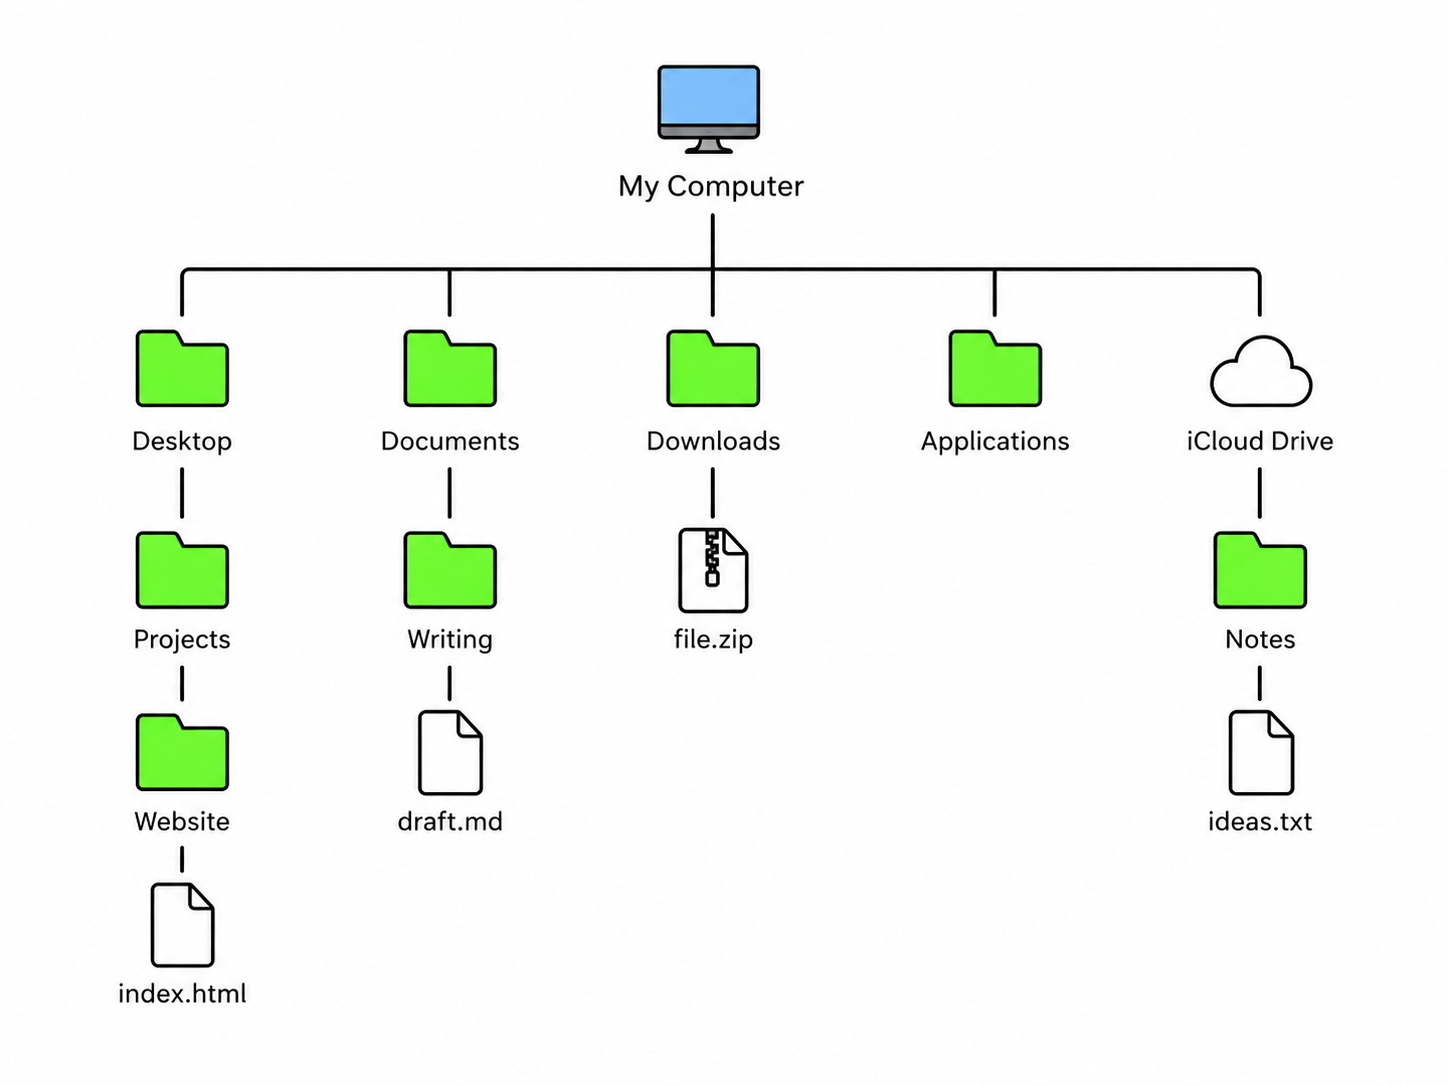
The structure underneath all of this is called a file tree: a branching hierarchy of folders and files, starting from a root and spreading. Every file lives at an address in this tree: A few terms to commit to memory for your agentic journey:
Root
The top of the tree for a given session. When you open your agent and point it at your Desktop, the Desktop is the root. Everything the agent can see branches out from there into that root’s folders and sub-folders.
Folder / Directory
A container for files. “Folder” has become the name as it is a visual metaphor from when we used paper files. “Directory” is what engineers call it.
Subfolder / Subdirectory
A folder inside a folder. Engineers call it a subdirectory; the folder containing it is the parent directory.
Path
The address. The agent navigates by it. You will start to read paths fluently faster than you expect. Desktop/projects/my-website/README.md.
ACTIVITY 1
One. Take everything currently on your Desktop and move it into a single folder.
Two. Call it 'Desktop Archive' or 'To Sort' (whatever you’ll recognize).
Three. Put it somewhere other than the Desktop; Documents works fine. This folder will become an archive (and the first project we will tackle in Part 3). For now, you have a fresh visual start for your machine. As you know, all the files are still there and there’s nothing special about moving them off the Desktop, since the Desktop is just another folder; but my mother always said a clean room is better to work in, and she wasn’t wrong.
*Pro-tip: on Mac, there’s a feature called Stacks (right-click your Desktop to find it) that groups files automatically by type. Worth knowing for ongoing hygiene. But the move-it-all-to-one-folder approach is enough to start.

Step 2: Download your app
But first, a Pedagogical Interlude . . .
Before you download anything onto your machine, please humor me in pausing for a teaching moment about what you are actually downloading. And if you already have a gen AI desktop app, great, see this as a review, or a possible introduction to what is actually happening under the hood.
There are two things that any of the apps you might download today are affording you:
Access to an LLM (or many)
A graphical user interface to navigate what an LLM can do for you
Large Language Models
We talked in Part 1 about the risks: permissions, privacy, the two walls, what it means to give a system access to your computer. That was the why-to-be-careful. This is the what-it-actually-is.
Any app you use to help you build agents is, ultimately, relying on a large language model (LLM). And while they feel like magic, they are just software that is highly competent at predicting. So, while “large language model” gets thrown around all the time these days, it’s a prerequisite to my two main stances (intent and audit-ability) that you actually understand it.
To make a large language model, companies like Google, OpenAI, Anthropic, etc., and research institutions like my very own UC Berkeley create models trained on an enormous amount of text. They essentially say: “read this” and then, based on all that reading, teach the model how to finish any sentence given some input. To do this, a significant portion of the written internet (books, academic papers, documentation, blogs, Reddit … oh so much Reddit!) across many spoken languages, many written languages, and crucially, many coding languages, was funneled into these models. Each company or institution worked on getting the prediction as good as possible and able to respond as fast as possible to any query. Through that training, the model learned the statistical relationships between words. Or more precisely: between tokens. (We’ll get into what a token is in Step 3, for now, think of a token as roughly a word or part of a word.)
So, in essence, any LLM’s singular skill is to predict what comes next. That’s it.
But … given an LLM can do that extremely well at (1) very large scale, (2) across every language humans have written (including the languages computers speak) … this behavior from the LLM looks like it understands. Looks like it is reasoning. Looks like it is creative.
But it is not. At best what you are seeing is recapitulated prediction.
And, functionally, that is certainly close enough to understanding, reasoning, and creativity to be useful.
However, understanding the mechanism (that it is just prediction) matters for working with it well.
Pop quiz: you can probably answer this now. Why can LLMs write code?
Because code is also language. It has syntax, grammar, patterns. And as we just learned, an LLM predicts the next token in a piece of language and it predicts the next line of code just as readily as it predicts the next word in an English, Spanish, or Dutch sentence. And underneath all the icons and buttons (the visual interfaces that mediate our relationship to the underlying architecture) every computer runs on text-based commands. So when an LLM produces code, it is doing exactly what it does when it produces English: predicting language. Just a language you (maybe) don’t read (yet). That is the chain. Natural language in, natural language or code out. And if it’s code, your computer can do something with it.
Graphical User Interface
The apps you will shortly download are doing something computers have done since the 1970s: wrapping a text-based system (which is all computer systems, even graphical programs run on textual code) in a visual interface.

The first computers had no icons, no folders you could click, no mouse. You inputed commands directly. What changed over time was the layer added on top: the graphical user interface (GUI). Pioneered at Xerox PARC in the 1970s and brought to consumers by Apple in 1984, GUIs translated “type a path” into “click a folder.” The apps you are about to download do the same thing: they wrap what is ultimately a text-based agent into something you can navigate without memorizing syntax.
This matters because the agent, at its core, is still working in text. When it “creates a folder,” it is predicting and executing a text command. The visual interface makes that invisible and that invisibility, at least at this stage can be a risk. So, we will think carefully throughout this series about when that invisibility is useful, and when it is seriously dangerous to let it be obfuscated.
Let’s work through an example you likely know well. Word. You use Word to write documents . . . or maybe you use Google Docs, but the analogy is the same. The thing is, Word is 40 years old. Which means its GUI is so mature you don’t need to think about the underlying file format or code at all. You just write what you want to write and use buttons to format and organize things. Contrastingly, gen AI tools are only four years old, and agentic AI only two or so years old. Which means their GUIs are not yet mature enough to fully abstract what’s happening underneath (or what could happen underneath, as the use cases are vast) into an array of buttons and other graphical navigation strategies. Importantly, this might not actually be a bad thing, even if it is still different from what you are used to. The argument for this is present in the fact that academics use LaTeX to write papers.
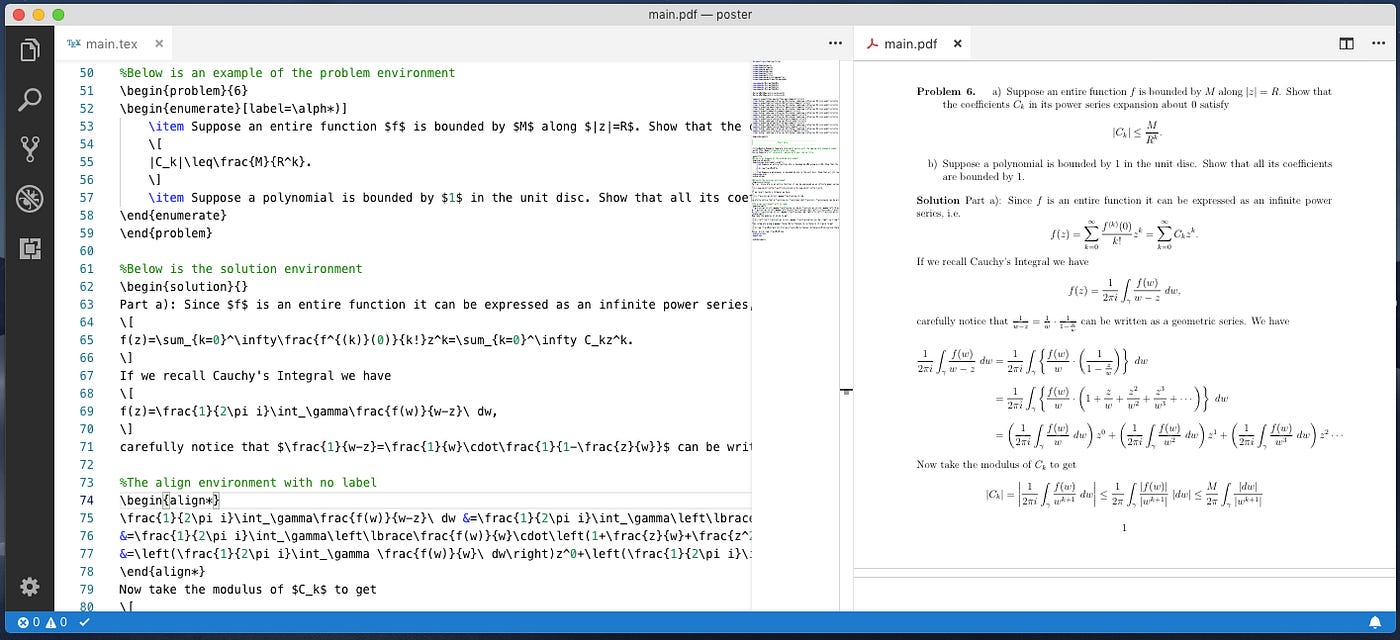
Academics don’t use Word because Word’s GUI, however powerful for consumer needs, wasn’t built for what academia actually requires: mathematical equations, precise spacing conventions, complex table formatting, bibliography management, cross-referencing across long documents, and reproducibility (a LaTeX document renders identically for every reader, on every machine, submitted to every journal … a Word document notoriously does not). LaTeX exposes the structure Word intentionally hides as a way of improving the user experience (UX).
But more than that, LaTeX requires you to declare your intent explicitly before anything happens. You cannot grab a table from a dropdown menu. You have to write what the table is, in code, before it exists. In this way, LaTeX looks more like document-making before Word, before GUIs smoothed over the underlying architecture, than it looks like Word itself. But it works this way (much like tools for LLMs do now) because: (1) the needs of academics formatting documents are vast, and (2) there are not enough of us for there to be consumer-grade tools.
The analogy to agents: right now, working with agents puts you in a similar boat to academics working with LaTeX. You have unique needs, and there aren’t enough of us at the party yet. So, the GUI of this paradigm, 40 years from now, will simply look different. In the interim, your goal is to have explicit intent before execution. The GUI is not yet mature enough to abstract away the underlying code, which means vague intent produces unpredictable output … and unpredictable output is the beginning of auditability collapse.
Ok, now let’s download!
Two options. Either works. Pick one, you can add another one later.
Ultimately, they work similarly. Each gives you the two things we just discussed: access to a large language model, and a graphical interface for navigating what that model can do with your files. In both cases there's a text-based agent underneath, wrapped in buttons. The difference is mostly which models you can reach. Claude Code runs Anthropic’s, Cursor lets you pick between Claude, Gemini, and others.
If you have $20/month to spend, choose Claude Code desktop app (claude.ai)
(Three of you will get a free week of co-work if you use this link.)
Anthropic’s own desktop application. The app has three modes: chat, co-work, and code. They clearly care about UI (user interface) design, and release new features frequently.
You may have seen that you can run Claude Code directly from your system terminal. I strongly suggest you don’t. It’s bad UI for newbies, and there is objectively no benefit at this stage. Knowing what a terminal is and how it works, however, is important, and we will review that in Part 3.
If you have dabbled a bit in code and want to see the code, choose Cursor desktop app (cursor.com)
This is a more classic integrated development environment (IDE) built on long-time coding tool VS Code with Claude and other LLM models embedded in its agent section. Best if you’re likely to look at code files, manage multiple projects, or eventually want to work alongside a developer (or become one yourself!).
Lastly, you must get a GitHub, and it’s free! (github.com)
GitHub has been around since 2008 and it’s named after git, a version control system created by Linus Torvalds in 2005. Torvalds named it “git,” which is British slang for a stupid or contemptible person … In any case, GitHub is simply the hub where git repositories live, which support version control (a system for tracking every change made to a file over time including: who changed what, when, and why) so you can collaborate without overwriting each other’s work, and, importantly for us, revert to any previous version if something goes wrong.
If you remember the anxiety of hitting Cmd+S compulsively while writing an essay in high school, terrified your work would disappear, you are going to love GitHub!
You won’t use GitHub in this post. But in Part 3, the first thing we do with a real project is put it under version control … so that when an agent changes forty files and you don’t like the result, you can put everything back exactly as it was. Anyways, make an account now so it’s not in your way later.
Step 3: Open it and orient
Open the app. Before you type anything, look at what’s in front of you.
(I’ll walk through Claude’s Code mode here. Stages 4/5 onwards, I’ll also use Cursor … but the affordance themes are the same.)
A few things to notice before you touch anything:
A few things to notice before you touch anything:
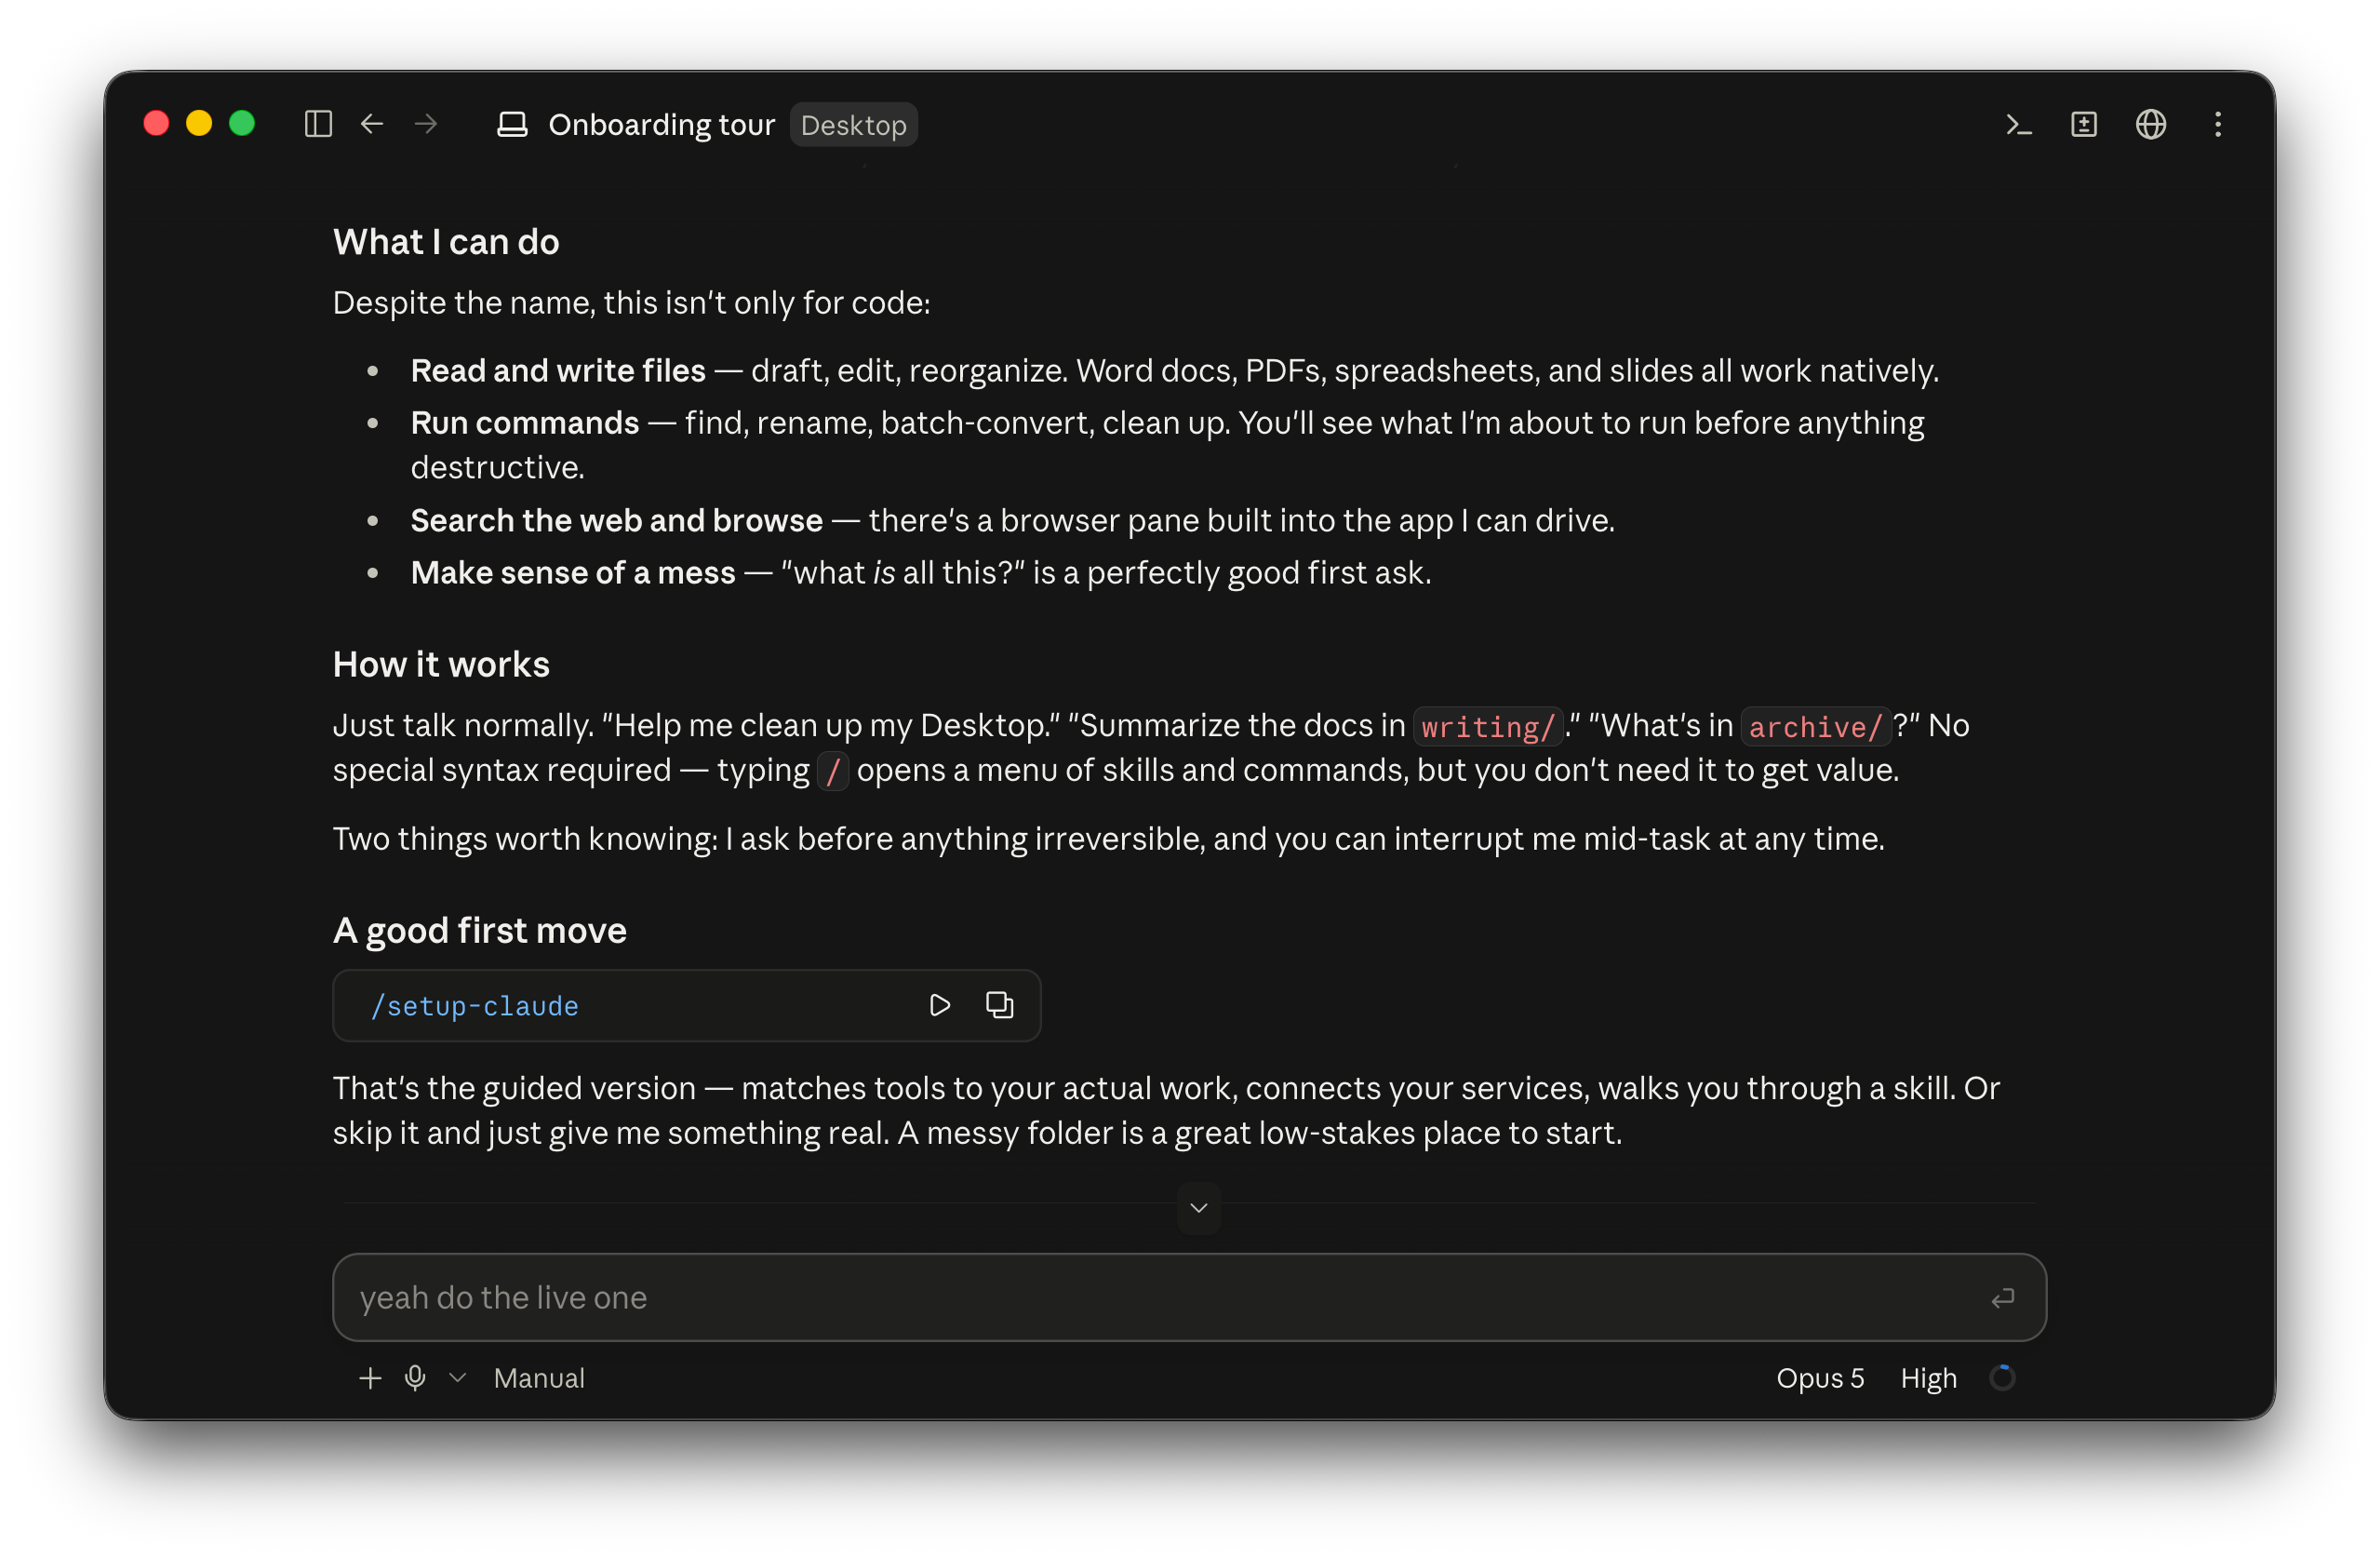
The chip in the footer bar is your root folder. In the screenshot it says Desktop, that’s the folder this session is pointed at, and the boundary of what the agent can see. Set it to the folder you just cleaned up.
The bottom-left word is your permission mode. Here it reads Manual.
The bottom-right is your model and effort level. Opus 5, High. Different models are better at different things and cost different amounts per token; effort controls how much thinking the model does before it answers. And that small blue ring fills as your conversation consumes the model’s context window (i.e., the fixed amount of text it can hold at once).
The plus button and the microphone sit next to each other at the bottom. Plus adds files to the conversation. The microphone is voice-to-text.
The toggle at top left opens the sidebar, where your projects live.
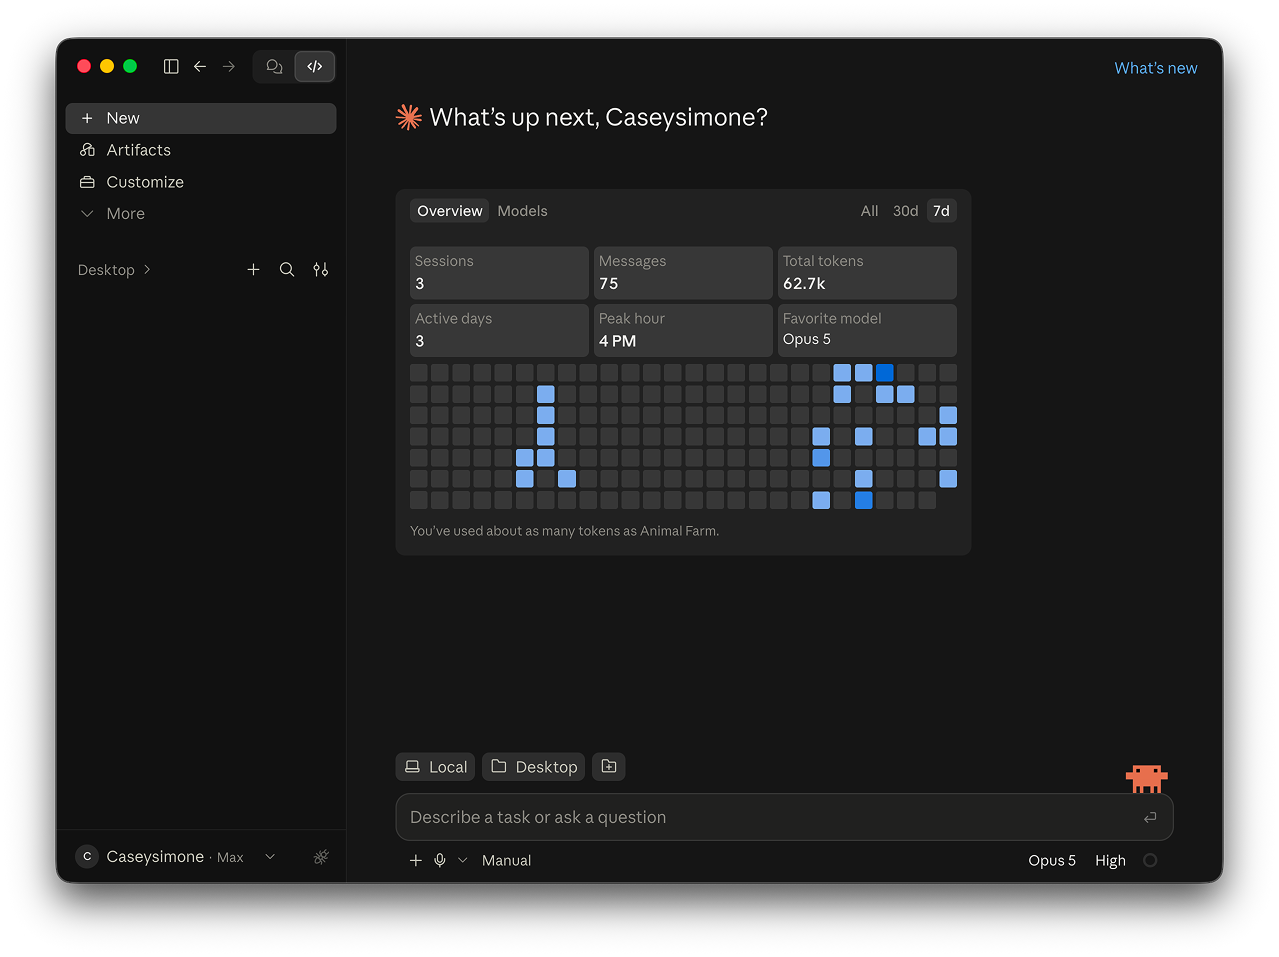
As you can see, you are not in a browser. You are not exactly in a chat interface.
Though as some commenters correctly pointed out:
“is the Stage 2 to Stage 3 line (read-only conversational AI vs. write-enabled agentic AI) not less firm? For example, Stage 2 tools can pick up Stage 3 capabilities via MCP.”
“the boundary between chat, co-work, and code (or stage 1, 2, and 3) is rapidly blurring.”
In any case, we will set a likely temporary boundary that defines the paradigm you are now working in as: the agent has direct access and read and write permissions to your actual files.
ACTIVITY 2
First point your session at a folder. Set it to the folder you just cleaned up.
Now type something. Anything. Treat it exactly like you would a conversational AI, because right now, that’s what it is. Ask it:
What can you do?
What can’t you do?
What might a good first project look like for someone just getting started?
And anything else your heart desires…
Don’t ask it to build or create anything yet. Just talk.
Notice what appeared.
Once you’ve sent a message, notice the UI elements:

The chip in the title bar is your root folder. In the screenshot, it says Desktop (that’s the folder this session is pointed at, and the boundary of what the agent can see).

The bottom-left word is your permission mode. Here it reads Manual. That single word is the difference between an agent that asks before it acts and one that doesn’t.

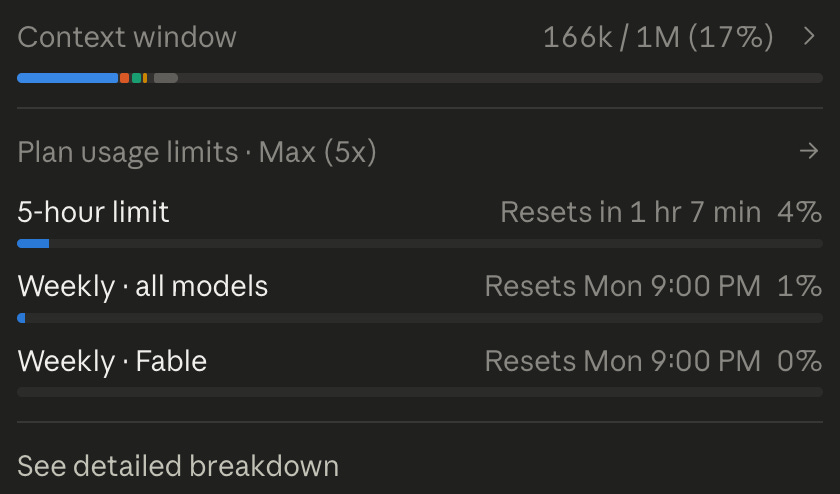
The bottom-right is your model and effort level. Opus 5, High. Different models are better at different things and cost different amounts per token; effort controls how much thinking the model does before it answers. And that small blue ring beside them is the one to watch. It fills as your conversation consumes the model’s context window (i.e., the fixed amount of text it can hold at once). Click the circle and will also show you your model usage.

The plus button and the microphone sit next to each other at the bottom. Plus adds files to the conversation. The microphone is voice-to-text.

The toggle at top left opens the sidebar, where your projects live.
Understand what just happened, and what it cost.
That conversation you just had? It cost something. Not much, but something. Every word you typed, every word it responded with cost tokens. See, LLMs are stateless: they have no persistent memory between calls (calls = what you send when you hit enter). So every time you send a message (a call), the entire conversation history gets bundled up and sent to the model along with your new message. A chat that starts cheap gets more expensive the longer it runs. And that cost grows, not linearly, but quadratically (if you double the length, you roughly quadruple what it cost to have).
Before you panic, if you’re on a subscription plan (Pro, Max, etc.), you cannot accidentally rack up a massive bill because you used too many tokens. This is because you have a token limit per session within a given time frame (Claude’s session resets every 5 hours, for example). When you hit the token cap per session, the model simply stops and tells you to take a break until it resets.
For these reasons, you will not end up like the people you’ve seen posting screenshots of four-figure overnight bills. Those are people using the API with no spending cap, which is a different situation entirely, and one we’ll cover later in the series.
On a subscription plan, the amount you will pay is fixed.
But you are still managing cost.
Here though, instead of money, what you’re managing is how long you can work before hitting that cap. In this guide we will explore strategies for avoiding hitting this limit in a 5 hour window (aka “tokenmaxing” strategies), including:
keeping your sessions short and contained
not uploading PDFs (instead copying and pasting the text)
using other (free versions of) LLMs to generate your prompts
etc.
Now that you understand all this about tokens, perhaps you also better understand those media stories of people getting genuinely attached to their chats and devastated when they hit the context window limit and have to start building their “relationship” with the chatbot over from zero.
(There’s a tool for this in Claude Code called compacting, which squeezes a long conversation down to a summary so you can keep going. We’ll get to this in part 3.)

In any case, in this guide you will learn how to not be that person (neither in anthropomorphizing the chat or agent, nor in being so long-winded and disorganized that you need such a long chat to begin with). Instead, it will become second nature that when a topic feels done, you open a new chat. (And if you are as particular as me, you will even delete the previous one.)
To gain this instinct for wrapping things up in a given session, you will need to be keeping track of your intent. And soon we will learn to do this by maintaining local files and asking an agent to log your progress locally (local = means on your device).
But tokens are not the only cost of long, meandering chats. They also lead to the model drifting in focus and clarity itself.
This is a known and active problem the folks in AI are working to fix, but one way of not finding yourself saying “what the heck, that makes no sense!” at 2am to your agent is by making sure it, also, isn’t getting tired. So, again, the advice here, is retire your chats early and often.
ACTIVITY 3
Ask Claude directly about things, like tokens and permissions, too.
Paste in a chunk of text and ask: “How many tokens is this ?”
“How much of my session capacity is this taking up?
What can you do and not do?
Your tools for managing these costs.
Tokens are one kind of cost. The other is what happens to your files. Here are the controls for that. In the bottom-left corner of your window, you’ll see a single word. In my screenshot it says Manual. Click it and you get this menu:
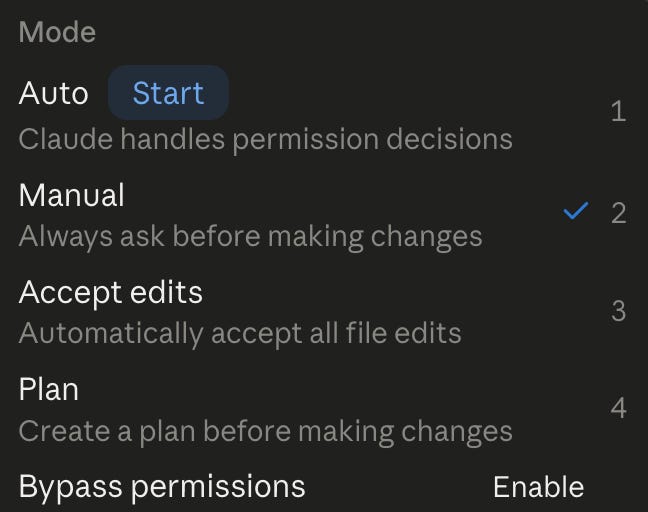
Auto: Claude handles permission decisions. The agent decides for itself what’s worth asking you about.
Manual: Always ask before making changes. Every change gets a prompt. You say yes or no.
Accept edits: Automatically accept all file edits. The agent edits freely, but still asks before running commands.
Bypass permissions: the agent runs without stopping for anything. Note that this one has to be separately enabled.
The numbers on the right are keyboard shortcuts, so you can switch modes without leaving the keyboard.
My recommendation, for right now: Manual. Every time. Yes, it is tedious. That is the point. The tedium is you building a mental model of what this thing actually does to your computer. You cannot skip that and you cannot buy it, you can only accrue it by watching. Once the prompts stop surprising you, you’ve earned the right to move faster. Not before.
Note that the app itself nudges you toward Auto. I’m telling you to override that. Not because the default is wrong in general (it’s a sensible default for someone with an established mental model) but because you don’t have one yet, and “Claude handles permission decisions” means the audit trail runs through the agent’s judgment instead of yours. At Stage 1 and 2, your judgment is the whole thing we’re building.
And then there is Plan mode. Here’s my honest take on it.
A commenter on TikTok asked,
“I feel like I constantly want to go beyond what’s in my brain, so I don’t feel as clear about intent. Is the solve to stay in plan mode until I feel good?”
Honestly, not quite. In theory it’s a great idea. In practice it doesn’t work, for two reasons.
First, plan mode is not always truly plan mode. As of this writing, I have watched agents execute actions with the toggle switched on, more than once.
Second, the toggle can’t do the part that actually matters. Staying in plan mode “until you feel good” assumes you already know what good feels like. That’s a skill, not a setting, and it’s exactly the skill we build in the second half of this guide.
So I don’t use the toggle. Once you know how to think like an engineer, planning becomes second nature, and I plan in natural language instead:
“I want to work on X. Please don’t execute anything yet. Let’s talk through this first, and when we’re both aligned on what should happen, I’ll tell you to go.”
This works more reliably than the toggle, and it keeps you in the habit of stating your intent explicitly … which, as you know by now, is the whole point. Planning vs. execution, communicated through language. Not a button.
Lastly, Bypass permissions is fast, powerful, and not for right now.
Permissions
But what about the costs to your life? We discussed in Part 1 the anxiety most beginners face: “the agent can get into my computer and fu*k up my life.” That’s a real potential cost to contend with, and now that you’ve seen a permission popup in the wild, here’s the fuller picture.
There are two distinct walls:
OS permissions, the outer wall. Your operating system controls which apps can access which parts of your computer at all. This was set when you installed the app.
In-app permissions, the inner wall. Within what the OS already allows, these control whether the agent checks with you before each action or just goes. This is the mode menu you just looked at, plus the yes/no on each individual prompt.
The rule: stay in Manual, and read every prompt before you approve it, EVERY time, until you have a clear mental model of what the agent is doing and why.
“until I’m ready to accept risks / feel comfortable, click ‘allow once’?”
That’s exactly right (well, ‘manual’).
WARNING! In some GUIs, the default is ‘always allow.’ If you press enter without reading, that’s the choice you made. So when you see pop-ups: Slow down. Read first.
So far, everything we’ve done happens on your machine. But agents get more capable, and capability means reach. Two terms you’ll meet as that happens:
An API (application programming interface) is a defined doorway that a piece of software opens so other software can use it. Your email has one. Your calendar has one. Your bank has one. It’s how one program asks another to do something on your behalf.
An MCP (Model Context Protocol) is a standardized version of that doorway, built specifically so models can walk through it.
Which changes the stakes of that permission prompt entirely. “Always allow” on a file edit means the agent can rewrite a document in a folder you can see. “Always allow” on a connected service means it can send the email. Post the thing. Move the money. Same two words, radically different blast radius.
To return to the metaphor from Part 1: your computer is a building, and your Desktop is one room in it. APIs and MCPs are doors that lead outside.
Understanding which wall you’re at, and what you’re permitting, is how you stay the author.
Two-window tip: any time you see an action in a permission prompt you don’t recognize, open a separate Claude.ai or ChatGPT window, paste it in, and ask what it does before you allow it. Many people stay in this two-window mode for months. That’s completely reasonable.
Before Part 3, let’s discuss what it means to think like an engineer
What beginners (often) do
Immediate urge to execute. Wanting to build before knowing what you’re building. Skipping setup entirely because setup feels like delay.
Idea dumping. Listing every project at once, no prioritization, no definition of done, no constraints. The agent gets everything, which means it has nothing to orient by.
Borrowed imagination. Ideas lifted from “build X in 10 minutes” tutorials, not from your actual workflow or needs. The project isn’t yours yet, it’s someone else’s demo translated into your life, poorly.
The actual skill a beginner should build
It’s not coding. It’s not prompting.
It’s this: giving shape to intention in a way a system can act on.
Designers call it requirements gathering. Engineers write specs. In product development there’s a document type called a PRD (a project requirements document) that defines scope, constraints, and goals before anyone writes a line of code. These practices have existed for decades. We just forgot we needed them here, because chat interfaces made winging it feel fine.
It wasn’t fine then either. It just wasn’t as visible.
The bottleneck moved from syntax to structure. Before, engineers wrote the code and that required technical knowledge. Now, more people can initiate systems. But structure, architecture, and clarity of intent still require skill. The interface changed. The underlying requirement didn’t.
What you’re building first, before any project, before any code, is a context layer.
The context layer is the structured information the agent draws on to do its work: where things live, what the project is, what you want, what the constraints are, what happened last session. Without it, the agent improvises. With it, the agent executes.
Building your context layer is the first project. Everything else comes after.
Why context comes first
Here is what happens without this.
Human engineers who skip documentation and spec work accumulate something called requirements drift (when implementation diverges from intent because the intent was never fully specified). In Agile development, it’s scope creep. In systems theory, it’s coherence failure. The same thing happens with agents, but faster.
A human engineer drifts over weeks. An agent can drift in an afternoon.
I’d call this project logic collapse: the agent isn’t wrong, exactly, it is making locally coherent decisions. But those decisions aren’t grounded in your intent, because your intent was never fully specified. Each action makes sense in isolation. Together, they produce output that matches nobody’s definition of what the project was for.
The old engineering discipline (requirements documents, architecture decisions, structured specifications) now has to live in everyone who initiates a system. You don’t have to be technical. But you have to think structurally. You have to know what you want before you ask something to build it.
The system is a direct function of how well you structured the context that feeds it. Output quality is set upstream, not at the agent, not at the prompt. At the context layer. In how clearly you structured the intent before anything ran.
Context first. Always.
ACTIVITY 4
Write down, in plain language, one thing you want an agent to help you with. Two sentences maximum.
Now paste it into a chat with this: “Don’t build anything. Ask me the five questions you’d need answered before you could do this well.”
Read the questions. Notice how many of them you can’t answer yet. That gap between what you asked for and what would actually need to be true is requirements gathering. You just did it.
In Part 3, we write the answers down.
What you now have
By the end of this session you should have:
A computer that’s navigable (Desktop cleared, one clean starting point folder)
An app open, and a working orientation to what’s on screen
A permission mode set to
ManualA first act of specification, in Activity 4
Not a finished project. Not a deployed app. The foundation that makes everything after it more likely to succeed.
Part 3 is the first real project where you’ll give the agent a real goal, and you start to feel what the structure protects you from.
Thank you for your patience, and please keep commenting your own tips and insights for your fellow readers!